I'm guessing if you're reading this post, you like the Doodle & Flow process enough to invest in fancier doodling supplies - or, like me, you have an art supply addiction. Either way, this is fantastic news. Congratulations!
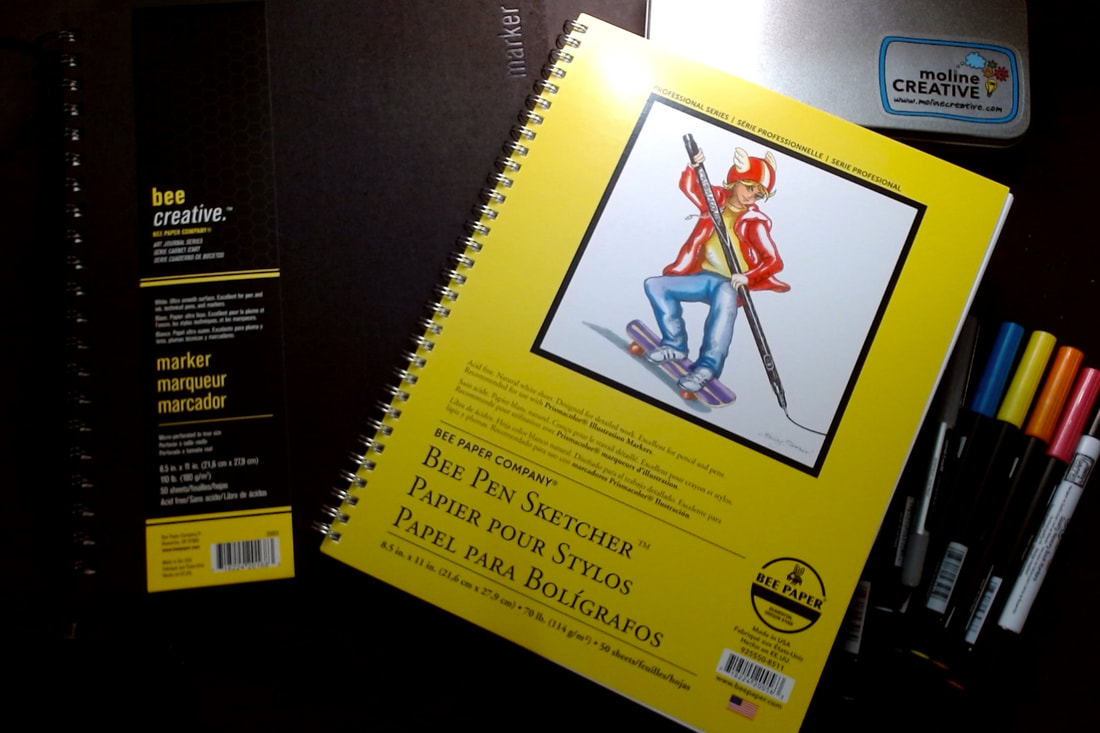
Let me keep this brief. I use three main things in my practice: silky smooth marker paper, pigment-based black markers, and colorful watercolor markers. I also carry my markers in a neat little case and sometimes use Avery labels to cover up my mistakes. Paper: Spiral bound, smooth, thick, perfectly white pages I have tried dozens of types of paper and I will write a review about the pros and cons of all of them at some point, but I like spiral bound blank sketchbooks when I draw with markers. I like them because I am often doodling on my lap and I never know how to manage the other side of the sketchbook if it is hard bound. I also like thick, smooth, perfectly white paper. I like thick paper so my markers don't "ghost" or show up on the next page. I like smooth paper because it uses less marker ink. I like perfectly white paper so I can use labels to cover up my mistakes. My favorites:
Black Markers: Pigment-based twin tips I wrote a whole blog post about my marker trials. I bought dozens of markers and tried them all! You can check my review here and my recommendation here. Briefly, I settled on Uchida Pigment-based Artist Markers. I like them because they dry fast, don't smear, and (most importantly) don't smell toxic to me. I also like that they have two nibs - skinny and thick. I don't like that they are expensive and seem to run out of ink really fast. Colorful Markers: Water-based brush tips I go back and forth between Tombow Dual Brush Pens and Neuland Fine Liners (brush tip). I like the dual tip feature because I mostly use my colorful markers for coloring, but occasionally I use the fine nib to write text. I like the water-based ink because it isn't toxic. If I am traveling and can't find Tombow markers, I will sometimes buy the generic Artist Loft version from Michaels. I don't like them quite as well because they aren't as juicy as the Tombow markers, but they work in a pinch. They are also a tiny bit shorter so they fit in smaller pen cases. Avery Labels: The littlest ones I also use sticky labels - the white ones you use to put on envelopes for mailing - to cover up my mistakes. My two favorite sizes for Doodle & Flow are 60 and 80 labels to a page.
0 Comments
This challenge is designed to be completed in tiny little chunks (5-10 minutes) over seven days, but as with everything in Doodle & Flow, complete it at your pace on your timeline. Feel free to string it out over seven weeks or binge it in seventy minutes. It is your practice. Do as you wish. 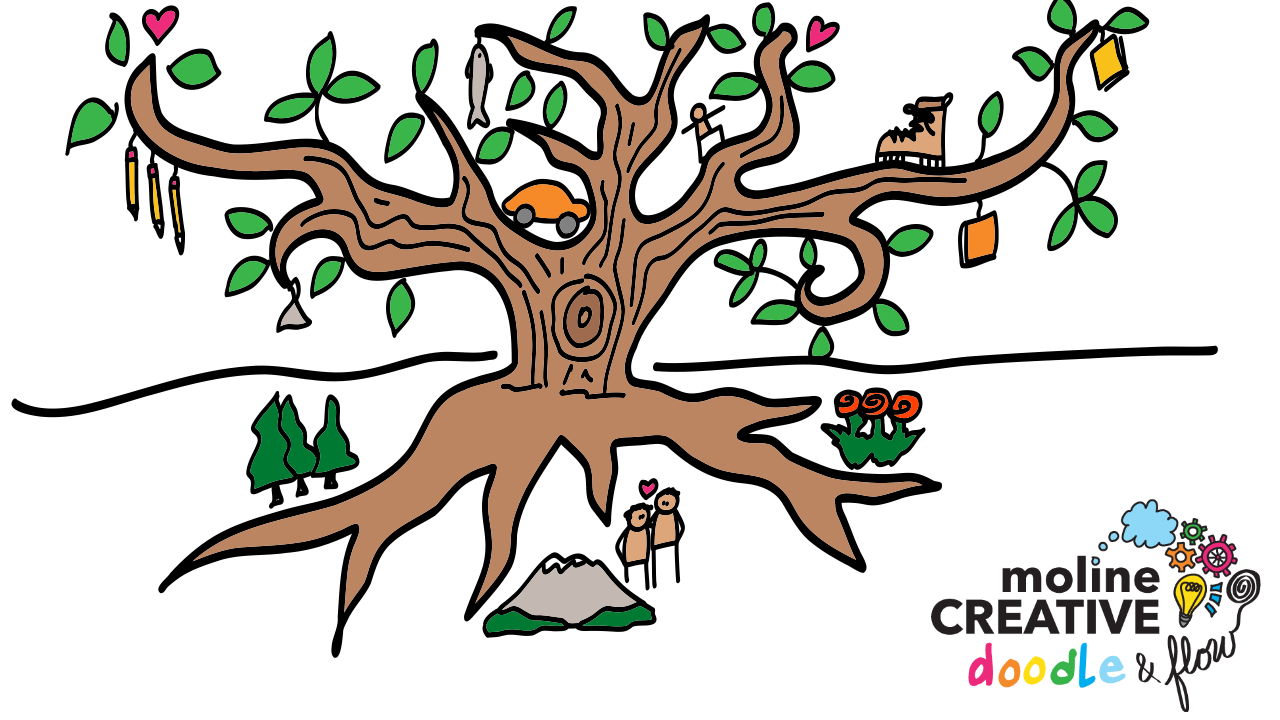 Day 1: Your & Doodle Your Life Brainstorm major events from your life (in words). You can write a list, paragraphs, or just keywords - don't worry about spelling or grammar. Now, draw quick, rough sketches / doodles to represent each of the events from your life (you'll use these later) Day 2: Doodle Your Tree Draw the trunk, roots, and branches of a wild and rambling tree. Leave lots of room on the page (between branches / roots) to add more details. Use permanent black ink. Day 3: Decorate Your Tree Add the items from your life to the branches and roots of the tree in permanent black ink. Consider where these items fit:
Day 4: Color Your Tree Color the tree and the items you added. Consider the distribution of color across the page. Sometimes when coloring the objects, I step back and fill in all of the yellow bits at once so I have yellow distributed across the page not all clumped together. Other times, I just color from one side to the other and see what falls out. Don't overthink it - just follow your intuition. Day 5: Add Flair Go back into your doodle and add flair to the items from your life. Flair means color, sparkle lines, shadows, patterns. Also add things outside the tree that you aspire to experience, achieve, attain. Just doodle the essence of these items... maybe a heart for love or the sketch of a map for a place you'd like to visit. Day 6: Observe Your Tree & Yourself Take time to sit with your tree of life. Hang it on the wall. Look at it with a relaxed mind for 5 minutes or so. Hold your blankbook and a marker in your hand while you look. Reflect on the highs and lows. Make notes of what you observe in your tree of life. Ask yourself questions that you will answer tomorrow. Day 7: Reflect on the Process
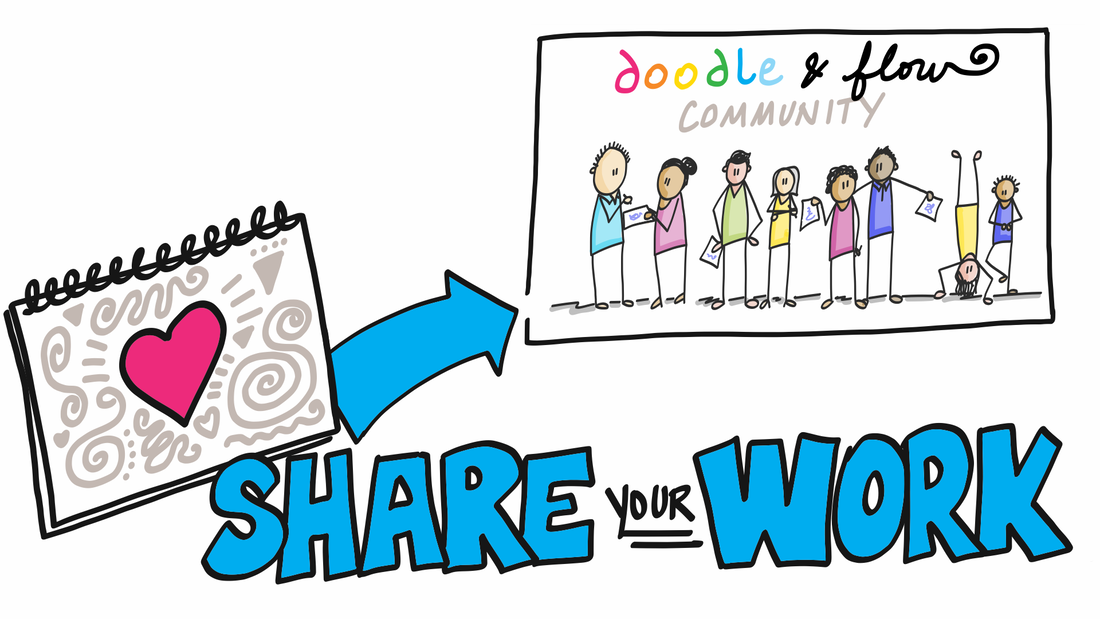
Share a photo of your doodle on social media and in the Doodle & Flow online community! Hashtags: #doodleandflowpractice #flowersandvines #molinecreative
It is about insight, not art.  Doodle & Flow is a process that is designed to put you in a "flow" mindset and help you tap your intuition, your creativity by allowing your mind to wander, gently. The flow space allows your spontaneous brilliance to emerge, so please do not get caught up in the drawing and art-making of Doodle & Flow. This is about process, not product. Allow yourself play and see what arises!
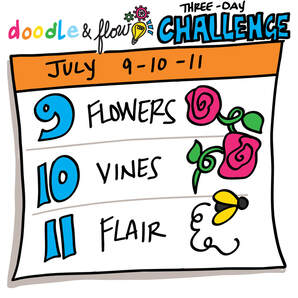 Day 1: Flowers Draw a series of slightly wobbly spirals that will become simple roses... or you can draw any other type of flower. This is about the process, not the product. Draw whatever brings you joy. Day 2: Vines Add vines. Consider adding curls to your vines and working out what it looks like when the vine winds around itself (it appears smaller as it moves away from you). Day 3: Flair Add color to your vine and consider adding flair like grapes, flowers, bugs, bees, birds. Share a photo of your doodle on social media and in the Doodle & Flow online community! Hashtags: #doodleandflowpractice #flowersandvines #molinecreative
 Doodle & Flow is a process that is designed to put you in a "flow" mindset and help you tap your intuition, your creativity by allowing your mind to wander, gently. The flow space allows your spontaneous brilliance to emerge, so please do not get caught up in the drawing and art-making of Doodle & Flow. This is about process, not product. Allow yourself play and see what arises!
Have you woken up in the middle of the night because your mind was racing through your busy to do list? And then drifted peacefully off to sleep after you wrote the list on a notepad beside your bed? If so, this post is for you... I have been keeping a journal, diary, or sketchbook for the past 30 years. Over that time, I've learned to use doodling and writing to shift the speed of my thinking depending on what life requires of me. There are times when my brain is moving slowly and I can't get motivated to work on a writing project, so I sketch out what I am going to say - not outline what I am going to say, but doodle a picture of what I am going to say - and my mind warms up Other times my mind is racing so fast that I can't think deeply enough to solve a client's problem, so I clear the chatter by writing quickly or making lists. I use this process, which I call Doodle & Flow, daily to meet life's challenges. Recently I have started sharing the process of Doodle & Flow with colleagues and friends. Because much of my own learning has come from personal writing, that's where we're starting. Together we are building a community of creatively curious people who want to shape their own thinking to quickly generate new ideas, thoughtfully consider their lives, cultivate stronger relationships, and live intentionally. I can't wait to share the doodles that these amazing humans are creating and the insights that are emerging for them. Stay tuned for Doodle & Flow... coming July 20th. Sign up to receive Doodle & Flow warm up exercises, doodle challenges, and info about new courses. 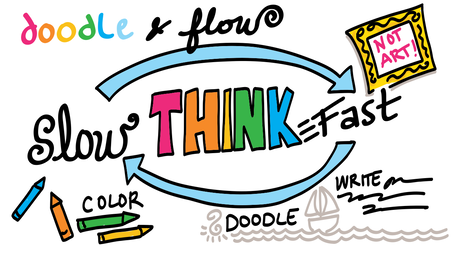 Drawing in honor of an old friend I recently learned that one of my favorite mentors from graduate school, Dave Swift, had died when I was invited by the Natural Resource Ecology Lab to a symposium in his honor. Dave was one of my GK-12 advisors during my doctoral program at Colorado State University, but he was so much more. I first met Dave when I bounded into his office to inquire about being sponsored by the NSF GK-12 program, which paired graduate students with K-12 educators in Fort Collins. We hit it off immediately (which I attribute more to Dave's affable personality than to mine) and had a great conversation about my research in Latin America, camping in the Southwestern US, and the value of getting students into the field when teaching ecology. Fast forward three years and Dave was knee deep in Hall's Creek in Capitol Reef NP helping me with my field research. He and another NREL employee offered to help me with my fieldwork, but they preferred to help me in a location far, far from a vehicle than with anything "easy." The park biologist at Capitol Reef was more than happy to have us hike into Hall's Creek and sample aquatic invertebrates there, so we loaded up our backpacks with waders, sampling nets, and a couple of nights' worth of gear and headed for the hills. We had a wonderful time sampling the creek, telling stories around the camp stove and exploring the Narrows. 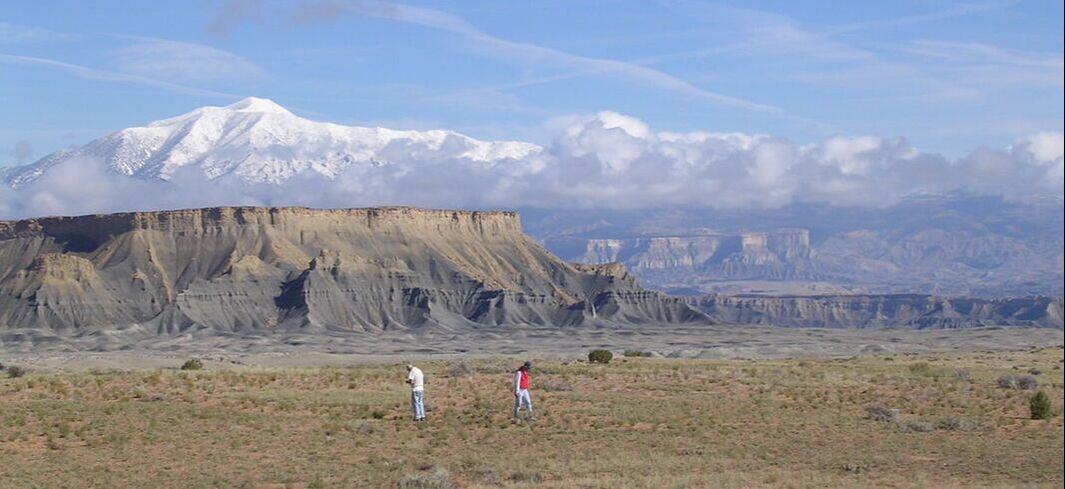 Dave Swift and Jonathan Straube exploring a field in front of the Henry Mountains on the way to Hall's Creek in Capitol Reef National Park. Dave and his colleagues inspired a significant shift in the way ecologists think about arid grassland ecosystems. Much of the early work in ecology took place in the eastern USA, which is a relatively stable place, so many ecological models are based on the idea that ecosystems are generally in equilibrium and disturbance pulls them away from equilibrium. However, arid grasslands are rarely in equilibrium because of the highly variable climate. Dave and his colleagues suggested that aridland ecologists just stop assuming that everything starts from equilibrium. It gets a little bit more complicated from there, but hopefully these visual notes will help you get a sense of his work and, perhaps more importantly, the way that he mentored and inspired other people to think and live outside the box. Breaking News : Moline Creative Creates Doodle Pack App! To help you better express your whims and desires, Moline Creative released an iPhone sticker app this fall. The app features a small collection of adorable emojis so you can share the love - or the pain - with the ones you love. Download it for free at the Apple App Store. I think a lot about comfort zones. When we went into COVID lockdown, the entire world was asked to step outside of its comfort zone. We left offices, schools, day cares, bars, restaurants, movies - our normal everyday lives - for a slightly scary, lonely, uncertain existence. I have been reflecting on the lessons I learned from my students when I taught wilderness expedition courses. On expedition, the people who embrace discomfort and step fully into the experience are transformed into bigger, better people. In fact, I intentionally create disorienting experience in order to allow participants to have a transformative experience. 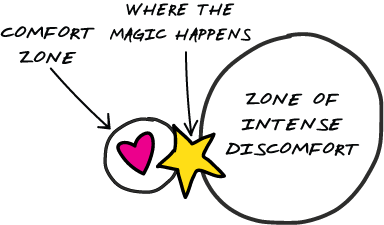 Welcome to your expedition
We don't have a choice about whether we want to join the Great COVID-19 Wilderness Expedition. It is here and so are we. We can embrace the uncertainty and allow it to make us better people or we can hide out and miss the experience. This what I learned from my students about how to embrace the expedition.
Wilderness expeditions are unforgettable - and transformative. People learn to embrace uncertainty. They make lifelong friendships. They notice and accept the significant accomplishments that they make each day. They also persevere and realize they are stronger than they ever imagined. Welcome to your expedition. You've got this. Please share how you and your community are growing during the COVID-19 Wilderness Expedition in the comments below. I had the good fortune this week to listen to Erin Bisenius of Sassypants Coaching talk about her work with neurofeedback, which can provide stress relief, ameliorate PTSD, help people sleep better, and reduce a person's perception of pain. Erin gave a basic neuroscience lesson - neurons receive bajillions of bits of information each second and pass it along to one another as electrical pulses. Our brains are complex, nonlinear, and "dynamical" systems that are constantly adjusting to stimulus and rewiring themselves. Our brains adjust so thoroughly that sometimes when we experience changes in our mental state, we don't even notice! What is Neurofeedback? Neurofeedback is a specific version of biofeedback, which just means collecting data about your body and providing feedback based on that data. The example Erin shared was that you could weigh yourself and use the data about your weight to adjust your eating and exercise habits. Neurofeedback collects data on your brain activity by sensing the electrical shift of neurons in your brain. The system that Erin uses - Neuroptimal - interpret the complex information collected by the electrical sensors attached to your scalp and senses phase shifts in your brain activity. "Sensing shifts in your brain activity" is the complicated part of that sentence and the short explanation is that there is a complicated algorithm in the computer that detects the shifts. The Neuroptimal system provides feedback to your brain through music. When your brain activity shifts, the music stops for a brief second to alert your brain to the shift. Your brain then decides what to do. That's it. You sit and listen to music and little skips in the music remind your brain to re-orient to the now, and respond in the optimal way for you. Amazing, right? Neuroptimal sessions consist of sitting (or laying down or moving around gently) and listening to music for 30 minutes. There is no minimum number of sessions, but many people start to notice results after 6-10 sessions. Because there are no side effects associated with listening to music (albeit with lots of skips in it), there are no side effects to Neuroptimal. How do I learn more? If this sounds cool, it is. Scoot over to Sassypants Coaching and send Erin an email to learn more. She does in-person Neuroptimal sessions and also rents the system for take-home use for 4 weeks at a time. April 7 session  April 8 session 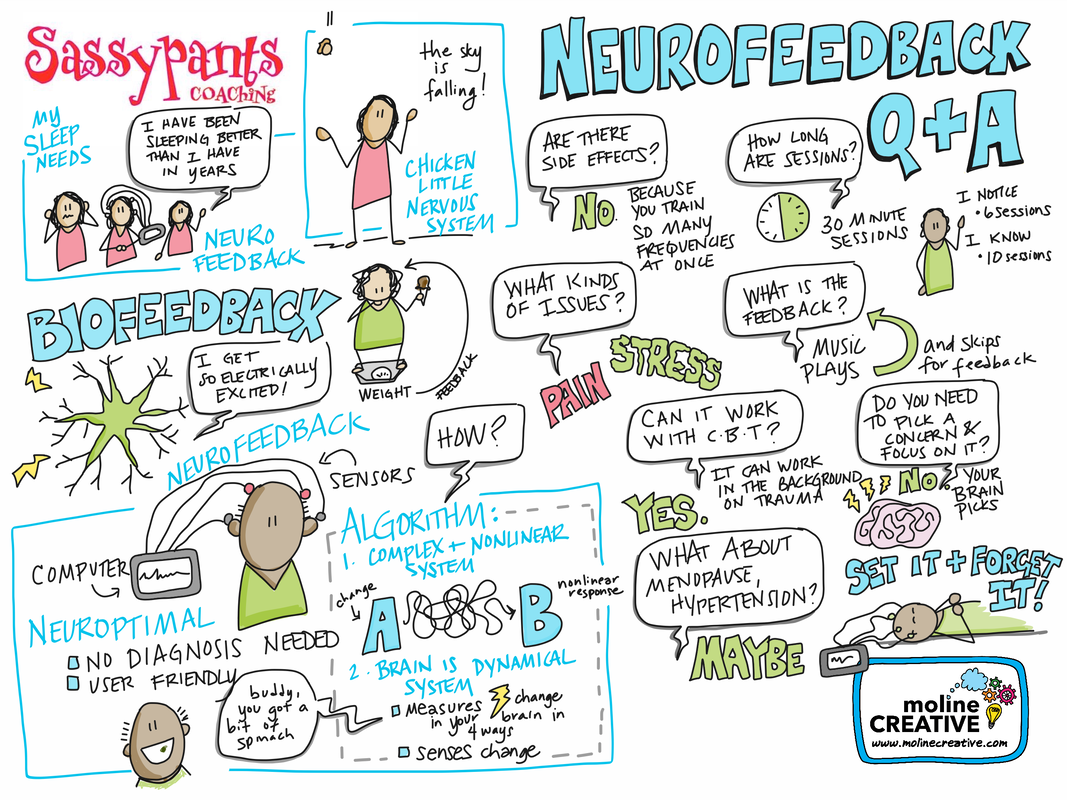 Like everyone I know, I have spent the past couple of weeks doing my part to prevent the spread of the novel coronavirus (washing my hands, working from home, staying six feet from people who don't live with me), but I can't stop thinking about the healthcare workers who don't have these luxuries. They are voluntarily stepping into the fire every day. And now we hear that there isn't enough personal protective equipment (PPE) to go around. There aren't enough masks, gloves, gowns to keep healthcare workers safe. A friend of mine who is a nurse posted a message on Facebook that was originally from Reddit. The message resonated with me, so I wanted to share it with a broader audience. The message to healthcare workers is simple: there is no emergency in a pandemic. Don't go in without your PPE.
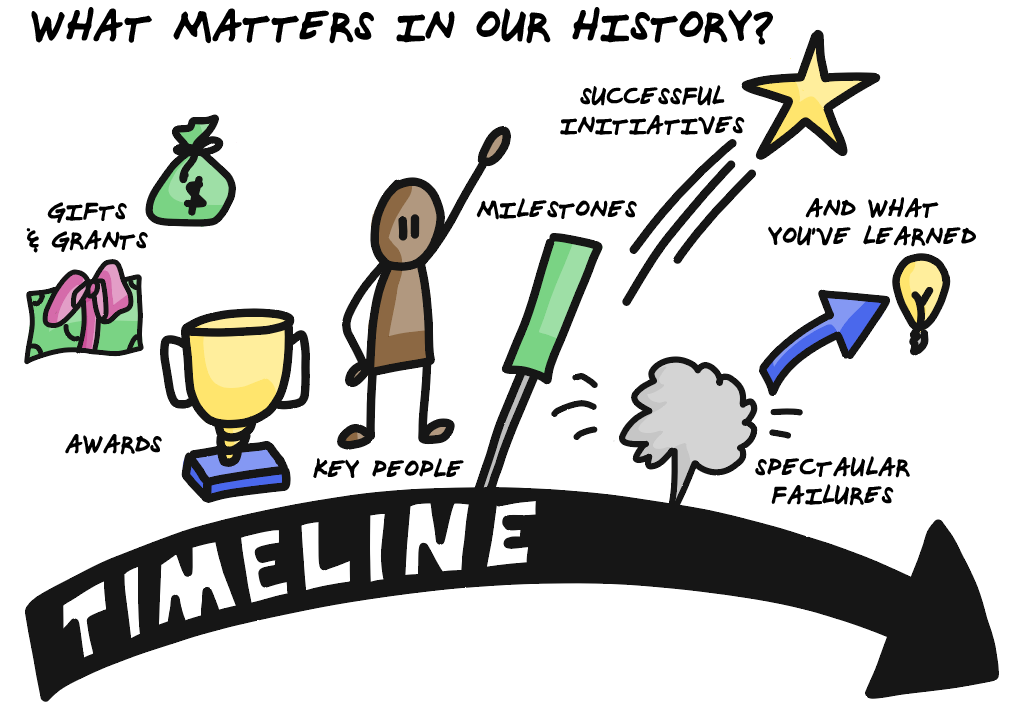
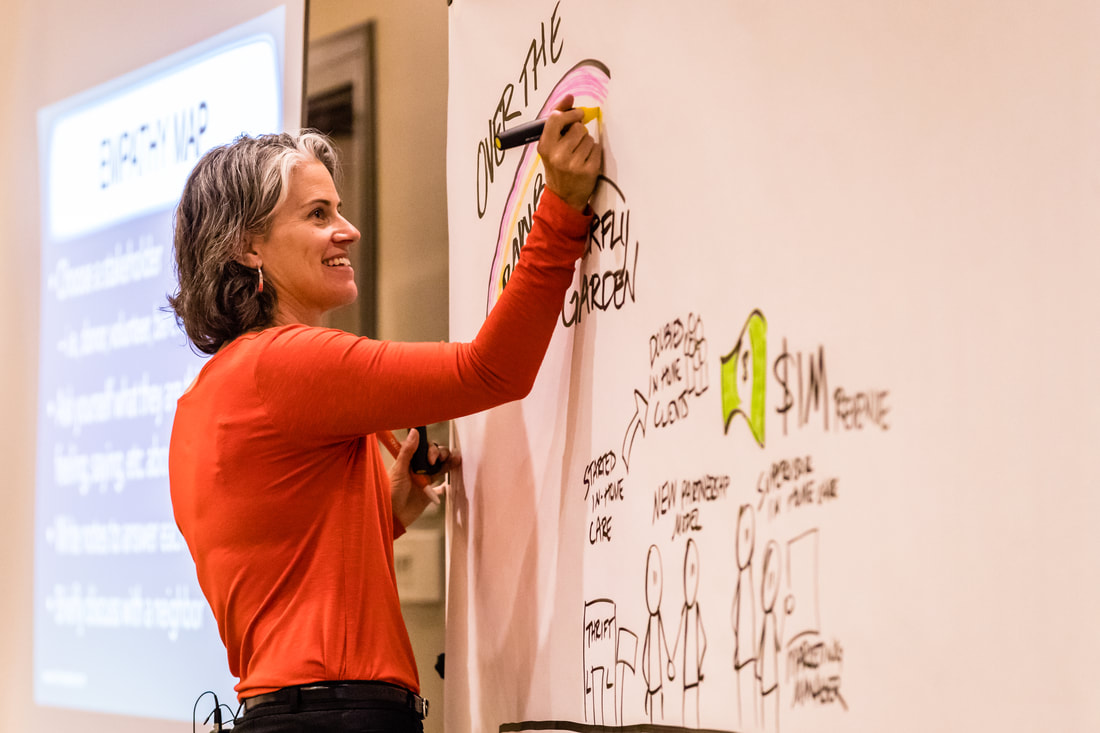
I enjoy strategic visioning. It brings me a lot of joy to unroll a clean sheet of paper, pull out my markers, and use my listening, drawing, and improv skills to help a group see their future more clearly. Recently, I was asked to speak at the 1st Annual Northern Arizona Center for Nonprofit Entrepreneurship Conference, which was hosted by Northern Arizona University, Moonshot, and your Part Time Controller. It was attended by dozens of nonprofit leaders, so I used this as an opportunity to share my love of working visually with a talented audience. Sometimes the most effective tools are the simplest, which is why I keep coming back to visual timelines for strategic planning. Visual timelines allow a groups to see where they have been and envision where they are going. They allow a team to celebrate their recent successes and study recent failures, so they can set realistic goals for the next few years. Visual timelines are a valuable map of the orgnizational landscape that meeting participants refer to throughout the planning process. After we draw a historical timelines during a strategic planning session, I like to ask the meeting participants to describe the future of their organization for me. This is a bluesky conversation. A brainstorming session. Then I draw their vision as quickly as they speak, so they see their ideas unfold. Once we have a sketch of the future, we discuss the big ideas and set priorities. Future priorities become future goals and an implementation plan. For some organizations the implementation plan is a concrete, step-by-step plan and others it is just a promise to follow the vibe that takes them towards their goals.
What are the steps to create a visual timeline?
Note: If the thought of drawing in front of a group scares you, you can always pre-print clip art or bring magazines that are relevant to your organization. Use scissors and glue to have fun creating a timeline collage. Of course, you are also welcome to email me for support. I love to draw and have assistance available for non-profit organizations who can't otherwise afford my services. |
Categories
All
Angie B. Moline
Dr. Moline is an ecologist and visual process facilitator who draws pictures to help clients think. She is currently on a quest to understand why live drawings are so compelling and how to make them as sticky as possible in order to improve communication, understanding, and memory. Follow here journey here! 
|


 RSS Feed
strategy
innovation
Communication
Clients & Case Studies
philanthropy
ABOUT US
|
|

